

Unit testing your C# code has truly never been easier. Today I will introduce how to get up and running and unit testing your C# code in only a matter of seconds with one of the latest testing technologies, xUnit, using a Test Driven Development (TDD) approach.
Series
I'm planning on making this article as part of a series on testing your C#/.NET apps. Since unit testing is so fundamental to good automated testing practices, I'm starting the series with unit testing with the fantastic testing framework, xUnit. I will be sure to update posts in the series when I publish new articles within the series.
Here are the articles within the C#/.NET testing series thus far:
- Unit Test Your C# Code Easily with xUnit and TDD
- Unit Testing Exceptions in C#
Unit Testing in C#
Unit testing is where we test a small module, or unit, of our code in order to validate that the code is working as expected. For the purposes of this article our "units" will be C# classes. Writing such unit tests is typically done while doing the actual coding.
Why Unit Test? - Unit Testing Saves Time
The number one reason to unit test your code is to save time. But wait a minute, wouldn't writing tests on top of your already perfect production code add time to development. The answer is yes, but for one, I'd be very suspicious of "perfect production code," and secondly, the time savings you get from unit testing is not necessarily from whatever user story or work item you create the code from, but from the entire lifetime from the code you're writing.
How many times have we modified some already-existing code, only to find out by changing the code in a certain way, we broke something in way we didn't originally predict? Our software has experienced a regression. If a customer or one of our users discover this behavior or experience a runtime error, then we've just introduced a bug. Now, someone working in production support has to go research the bug to determine if it's a bug, how to reproduce it, and determine if there's a workaround. This takes time. The support team passes the details to the engineering team, and now they research the bug from the technical side. The engineer originally responsible for introducing the bug now has to stop developing another feature critical to the business needs of the software in order to fix the bug. Now, the changes from the bug fix have to be testing in lower environments before it's ready for release, and if there's poor automation, or poor Continuous Integration / Continuous Delivery (CI/CD), this can take a lot of time and man hours. You get the picture, bugs we don't catch are time consuming... they are expensive, and worst yet, they are preventing us from writing the features critical to our business goals since time spent fixing a bug is time lost from writing the latest and greatest feature.
Unit testing with adequate test cases could've prevented a lot of this scenario. If there was an adequate test for the bug we ultimately introduced, the engineer could have caught the issue during development time, and fixed it on the spot with minimal time and headache.
Unit Testing Is Living, Breathing, Documentation of your Code
Well written unit tests with good test case coverage serve as living, breathing documentation of your code. If a unit test passes a scenario with certain parameters, you can objectively prove the code works under those parameters.
Test Driven Development (TDD)
Test driven development is a development methodology whereby writing code and tests is tightly interwoven, and you will start all development with a failing test.
Uncle Bob describes TDD with three simple rules.
- You are not allowed to write any production code unless it is to make a failing unit test pass.
- You are not allowed to write any more of a unit test than is sufficient to fail; and compilation failures are failures.
- You are not allowed to write any more production code than is sufficient to pass the one failing unit test.
For the purposes of writing code in this article, I will follow the TDD methodology.
Creating the xUnit Testing Project
With the first of this demonstration and introduction to the XUnit.net testing framework, we will write a simple speed conversion application. The goal is we will be able to input a speed expressed in kilometers per hour, and the application will convert the speed into miles per hour. I'm going to scaffold the new test project using the .NET Core command line tools.
Create the Solution
We will start our project by creating a solution in which to place all of our C# projects and code. This is very easy with the .NET core command line tools. Simply run the following command in your favorite command line to create our .sln file and navigate into the newly created folder, SpeedConverter:
dotnet new sln -o SpeedConverter && cd ./SpeedConverter/
Create the Test Project
After we've created our solution, we will create the test project that will use the XUnit testing library. Why create the test project before creating the actual application that's going to convert our speed? TDD Law #1 states we are "not allowed to write any production code unless it is make a failing unit test pass." So, before we write any "production" code, the code that'll do our speed conversion, we must create a failing test. Only at that point are we to create the project containing the production code if we're to follow TDD.
To create the test project that will use the XUnit testing library, we're going to use the xUnit dotnet template and then add this newly created project to our solution. The xUnit template will scaffold all of the dependencies and code we need to get started very quickly.
dotnet new xunit -o SpeedConverter.Tests
Now let's add this newly created xUnit test project to our solution.
dotnet sln add ./SpeedConverter.Tests/SpeedConverter.Tests.csproj
Awesome, in the course of just a few seconds, we've created a Visual Studio solution, a test project that uses xUnit, and added the testing project to solution. I love how the .NET core command line makes life very easy for creating and scaffolding new projects.
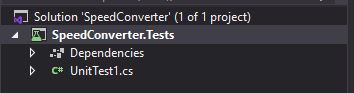
This is what the solution looks like in Visual Studio 2019:
We're now ready to write our first test!
Writing Our First Test
When we scaffolded the xUnit test project, SpeedConverter.Tests, included for us is an example unit test testing class called UnitTest1.cs. It kindly already includes a test method, decorated with [Fact], a method attribute that's part of the xUnit testing library. The [Fact] attribute is what tells the test runner that the method is a unit test thus adding [Fact] will make sure we're indeed unit testing this method.
Here's what our class looks like:
using Xunit;

namespace SpeedConverter.Tests
{
    public class UnitTest1
    {
        [Fact]
        public void Test1()
        {

        }
    }
}
Are we ready to run this test? No we're not. Part of our TDD workflow is following the Red-Green-Refactor approach. This helps ensure we're following proper TDD practices. The first part of Red-Green-Refactor, Red, means we will start with a failing test. If we were to run the test, Test1(), the test would pass. This isn't what we want for two reasons:
- If we're following the rules of TDD, we don't have a failing test that should lead us into writing our production code. We need to start with a failing test.
- It's good practice to see a failing test because it's easy to forget to add the [Fact] attribute. Luckily for us, xUnit will balk if we attempt to run our tests without the [Fact] attribute, but other testing frameworks are not so kind about it, and you could very well inadvertently skip a critical unit test because the appropriate attribute wasn't added to the unit test method.
To get around this, I'm going to get writing my first test for testing our speed conversion code. Now, I need to think about how I want my speed conversion code to work. Since we're unit testing, and our "unit" test is a class, I'm thinking about having a class called SpeedConversionService. The job of our SpeedConversionService object is going to be to convert speed expressed as kilometers per hour into miles per hour, so I think a method, ConvertToMilesPerHour(double kilometersPerHour), will do the job nicely.
A convention I like to follow is to name my testing class, in this case it's currently UnitTest1, to whatever class I'm testing and append "Tests" to it. So I will define and rename my unit testing testing class as public class SpeedConversionServiceTests. I will use the rename function within Visual Studio 2019, and this will rename (CTRL+R, CTRL+R) the class from UnitTest1 to SpeedConversionServiceTests as well as rename the file UnitTest1.cs to SpeedConversionServiceTests.cs.
Ok, great, we have our correctly named test class, now let's write a test scenario. I like to start out with a very simple input output scenario where I know the outcome for a given input without having to rely on the code to run to tell me the output. For our ConvertToMilesPerHour method, I'm thinking an input of 0 is a great start, as 0 kilometers would convert to 0 miles per hour. Let's write this in xUnit test form.
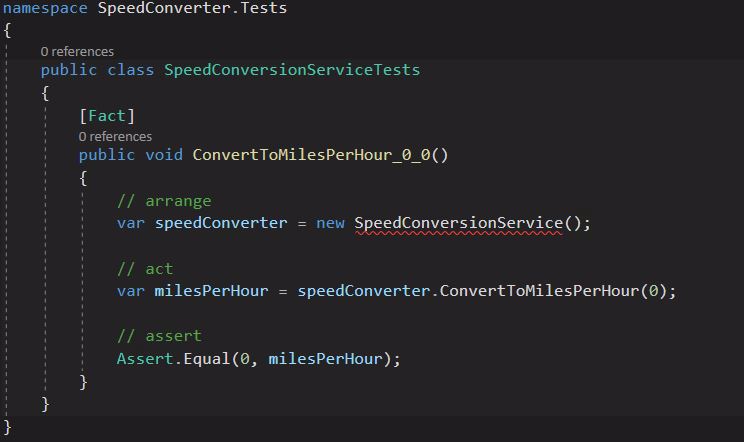
I've named the test method ConvertToMilesPerHour_0_0. There's not a hard fast rule as to what you should name your test methods, but I like to use the format: {Method under test}_{Input parameters}_{What I expect as the output}. I also format the test in the format of arrange (test setup), act (run the method we're testing), and assert (logically verify our results are what we expect). For this first test, I'll use the arrange, act, and assert comments, but for subsequent tests, I'll simply separate the arrange, act, and assert with extra line breaks.
To "arrange" our first unit test, I will initialize a new SpeedConverter object. To "act" on our first unit test, I will store the result of the SpeedConversionService's ConvertToMilesPerHour method with an input parameter of 0 into the milesPerHour variable.
Finally, I will "assert" by calling Assert.Equal on 0, the output we expect from the method we're unit testing, and the actual result in our milesPerHour variable. The order is important when calling Assert.Equal. The expected output is the first parameter, and the second parameter is the actual result of your method. If you get the order wrong, the test output from xUnit will be confusing if the test fails.
Now, you may notice the red squiggly line under the new SpeedConversionService() declaration. Usually a compilation error is a cause for concern, but this is intentional. At this point, we can say this test is failing, because this obviously going to result in a compilation error since we haven't written our production code that will contain our SpeedConversionService class. We can state the test is failing because the second rule of TDD states that compilation errors are considered test failures.
Writing Code Sufficient to Make Our xUnit Unit Test Pass
Now that we have a failing test, our next goal is make the test pass. To do that, we need to address the elephant in the room, our test doesn't even compile. To make it compile, we need to create a SpeedConversionService class. Let's create a new C# project, a class library, called SpeedConverter.Code. We can easily create our new class library and add it to your solution with the following commands while in the same folder as the SpeedConverter.sln file:
dotnet new classlib -o SpeedConverter.Code
dotnet sln add ./SpeedConverter.Code/SpeedConverter.Code.csproj
We now have our class library C# project that will contain all of our production code. Now I'm going to write our new SpeedConversionService class with the kilometers per hour to miles per hour conversion method. I will simply replace the scaffolded Class1.cs class with my new SpeedConversionService class.
namespace SpeedConverter.Code
{
    public class SpeedConversionService
    {
        public int ConvertToMilesPerHour(int kilometersPerHour)
        {
            return -1;
        }
    }
}
I've written my method, ConvertToMilesPerHour, that returns an integer that's the result of the passed in integer, kilometersPerHour. Notice I've chosen for it to return -1. This should be enough to make the unit test we wrote earlier to fail, since that's expecting 0 as the result.
Now, we're ready to run our only unit test, right? Wrong. Our unit test is still going to have the compilation error because we haven't pointed our SpeedConverter.Tests project to have the SpeedConverter.Code project as a dependency. We can quickly fix that by running the following commands to add the SpeedConverter.Code project reference to SpeedConverter.Tests.
cd ./SpeedConverter.Tests
dotnet add reference ../SpeedConverter.Code/SpeedConverter.Code.csproj
Finally, we need add the correct using namespace directive to our SpeedConversionServiceTests.cs file, build the SpeedConverter.Tests project, and we should be good to run our xUnit unit test.
using SpeedConverter.Code;
using Xunit;

namespace SpeedConverter.Tests
{
    public class SpeedConversionServiceTests
    {
        [Fact]
        public void ConvertToMilesPerHour_0_0()
        {
            // arrange
            var speedConverter = new SpeedConversionService();

            // act
            var milesPerHour = speedConverter.ConvertToMilesPerHour(0);

            // assert
            Assert.Equal(0, milesPerHour);
        }
    }
}
Alright, all systems go... Let's run the test by running dotnet test from the command line within our SpeedConverter.Tests project directory.
dotnet test
Here's the output of running xUnit unit test suite for the first time:
Starting test execution, please wait...

A total of 1 test files matched the specified pattern.
[xUnit.net 00:00:01.26]     SpeedConverter.Tests.SpeedConversionServiceTests.ConvertToMilesPerHour_0_0 [FAIL]
  X SpeedConverter.Tests.SpeedConversionServiceTests.ConvertToMilesPerHour_0_0 [7ms]
  Error Message:
   Assert.Equal() Failure
Expected: 0
Actual:   -1
  Stack Trace:
     at SpeedConverter.Tests.SpeedConversionServiceTests.ConvertToMilesPerHour_0_0() in \SpeedConverter\SpeedConverter\SpeedConverter.Tests\SpeedConversionServiceTests.cs:line 18

Test Run Failed.
Total tests: 1
     Failed: 1
 Total time: 1.9739 Seconds
We can see that the test failed. This goes back to me returning -1 from the ConvertToMilesPerHour method. The unit test expected 0 but the method returned -1 since it will always return -1.
Obviously always returning -1 isn't going to be best way to write a proper miles per hour conversion function, but we're going to follow TDD. The tests are what drive our coding, not the other way around. Now, let's make this test pass. What's the easiest thing we can do to make sure our test always passes? If you're thinking to return the kilometers per hour to miles per hour conversion formula from the method, that's a valid solution to get this test to pass, but it's not TDD since we'd be writing more code than necessary to get the test to pass. The easiest thing we can do to get this test to pass is to make it return 0, so that's what we'll do.
public int ConvertToMilesPerHour(int kilometersPerHour)
{
    return 0;
}
Instead of returning -1, we'll return 0. Let's see what happens when we run our tests once again with dotnet test.
Starting test execution, please wait...

A total of 1 test files matched the specified pattern.

Test Run Successful.
Total tests: 1
     Passed: 1
 Total time: 1.0946 Seconds
Awesome! Our test is now passing. We're done, right? No we're not, unless our goal was to write a speed converter than can only convert 0 kilometers per hour into 0 miles per hour. That's not terribly useful, so we obviously need to write more unit test cases.
Writing More Tests
Now that we've got our passing unit test, it's obvious that the method we're testing needs some work. For now, it can convert 0 correctly, but what if we pass in something else that definitely shouldn't result in 0? Let's write a new unit test and find out.
This time, let's see what happens if we try to convert 10 kilometers per hour. The correct result should be 6, since we're dealing only with integers.
[Fact]
public void ConvertToMilesPerHour_10_6()
{
    var speedConverter = new SpeedConversionService();

    var milesPerHour = speedConverter.ConvertToMilesPerHour(10);

    Assert.Equal(6, milesPerHour);
}
[xUnit.net 00:00:00.48]     SpeedConverter.Tests.SpeedConversionServiceTests.ConvertToMilesPerHour_10_6 [FAIL]
  X SpeedConverter.Tests.SpeedConversionServiceTests.ConvertToMilesPerHour_10_6 [2ms]
  Error Message:
   Assert.Equal() Failure
Expected: 6
Actual:   0
We've told our new xUnit unit test, ConvertToMilesPerHour_10_6, to get the result of the ConvertToMilesPerHour method and assert that the result is 6. It failed because the ConvertToMilesPerHour method can only return 0. We're now ready to modify our production code, so let's figure out the easiest way to make all of our tests pass.
public int ConvertToMilesPerHour(int kilometersPerHour)
{
    if (kilometersPerHour == 10)
    {
        return 6;
    }
    return 0;
}
Now, I've changed our method to check if the kilometersPerHour is 10, if so it will return 6, otherwise the code will return 0. This code is ugly, but we've satisfied TDD rule 2 and not written more code than is necessary to make the test pass. This should satisfy both tests, and xUnit should be happy after we run our xUnit test suite again.
Test Run Successful.
Total tests: 2
     Passed: 2
 Total time: 1.1059 Seconds
Great, our tests are passing! Are we done? No, I think we can find more faults within the code we've written thus far. Let's write a test that passes in 11, instead of 10, and see how that fares within our xUnit test suite.
[Fact]
public void ConvertToMilesPerHour_11_7()
{
    var speedConverter = new SpeedConversionService();

    var milesPerHour = speedConverter.ConvertToMilesPerHour(11);

    Assert.Equal(7, milesPerHour);
}
[xUnit.net 00:00:00.50]     SpeedConverter.Tests.SpeedConversionServiceTests.ConvertToMilesPerHour_11_7 [FAIL]
  X SpeedConverter.Tests.SpeedConversionServiceTests.ConvertToMilesPerHour_11_7 [2ms]
  Error Message:
   Assert.Equal() Failure
Expected: 7
Actual:   6
And of course, it fails. So let's write the code to make this new test as well as the others pass.
public int ConvertToMilesPerHour(int kilometersPerHour)
{
    if (kilometersPerHour == 10)
    {
        return 6;
    }
    if (kilometersPerHour == 11)
    {
        return 7;
    }
    return 0;
}
I've added yet another if statement to our conversion "algorithm", and all 3 tests now pass. I don't know about you, but I'm getting quite tired of adding if-statements for every possible input. We're at the point now we can write new test cases all day long to make this method fail a test. It's time for some refactoring.
Setup and Teardown Within xUnit
Many testing frameworks allow for us to do some setup and teardown before and after every test run. Currently, in all of our tests there's some code duplication in that every test has the line var speedConverter = new SpeedConversionService(); where we instantiate a new SpeedConversionService object every time. Within xUnit, this is very straightforward, all we need to do is declare a class variable of the type SpeedConversionService within our SpeedConversionServiceTests class, and then instantiate it within a default constructor.
Similary, we do the teardown stuff by implenting the IDisposible interface on our SpeedConversionServiceTests class. This is where it would be appropriate to do clean-up related tasks, such as reseting data to a known state so our unit tests don't affect other unit tests, or calling dispose on other dependencies that implement IDisposible. For the purposes of this demonstration though, I don't have any cleaning up to do, so I'll just leave my Dispose method empty.
Here's what the class looks like now:
using SpeedConverter.Code;
using System;
using Xunit;

namespace SpeedConverter.Tests
{
    public class SpeedConversionServiceTests : IDisposable
    {
        private readonly SpeedConversionService speedConverter;

        public SpeedConversionServiceTests()
        {
            speedConverter = new SpeedConversionService();
        }

        [Fact]
        public void ConvertToMilesPerHour_0_0()
        {
            // act
            var milesPerHour = speedConverter.ConvertToMilesPerHour(0);

            // assert
            Assert.Equal(0, milesPerHour);
        }

        [Fact]
        public void ConvertToMilesPerHour_10_6()
        {
            var milesPerHour = speedConverter.ConvertToMilesPerHour(10);

            Assert.Equal(6, milesPerHour);
        }

        [Fact]
        public void ConvertToMilesPerHour_11_7()
        {
            var milesPerHour = speedConverter.ConvertToMilesPerHour(11);

            Assert.Equal(7, milesPerHour);
        }

        public void Dispose()
        {
            // no-op
        }
    }
}
After making these changes, I re-ran the test suite to make sure everything is working as intended, and we're good to go. It's good to get in the habit of running your test suite after a big refactoring cycle, so you can address problems early on before writing more code on top of code that doesn't work as expected.
Data Driven Tests using xUnit's [Theory] Attribute
We just refactored our test methods to use a single instance of the speedConverter, and this saved us from writing quite so many lines of code to get our tests setup. Like [Fact], xUnit has the [Theory] attribute for reusing the same tests, but with different input parameters. Reflecting on our own unit tests, every test is exactly the same, except we're changing the input parameter, and expecting a different result for each test. This makes our tests excellent candidates for writing a single test but with varying input and output data with xUnit's [Theory] attribute.
To refactor our own test cases, we'll need to define a test method with the [Theory] attribute, and for each test case with data, we'll need to add an [InlineData(input, output)] attribute. Since we have three test cases, we'll need three [InlineData] attributes, and we'll need to have two parameters for our method, int input and int expected.
This is how our SpeedConversionServiceTests class looks after refactoring it to use the [Theory] attribute:
using SpeedConverter.Code;
using System;
using Xunit;

namespace SpeedConverter.Tests
{
    public class SpeedConversionServiceTests : IDisposable
    {
        private readonly SpeedConversionService speedConverter;

        public SpeedConversionServiceTests()
        {
            speedConverter = new SpeedConversionService();
        }

        [Theory]
        [InlineData(0,0)]
        [InlineData(10,6)]
        [InlineData(11,7)]
        public void ConvertToMilesPerHour_Input_Expected(int input, int expected)
        {
            var milesPerHour = speedConverter.ConvertToMilesPerHour(input);

            Assert.Equal(expected, milesPerHour);
        }

        public void Dispose()
        {
            // no-op
        }
    }
}
And naturally, after every refactor like this, I'm compelled to run the test suite again.
Test Run Successful.
Total tests: 3
     Passed: 3
 Total time: 1.0861 Seconds
Very nice! We still have all 3 of our tests, but with a lot less code to write for our tests. If we want to add more test cases now, all we need to do is add another xUnit [InlineData] attribute with an input parameter and expected output value.
Final Test
Alright, now that we've got several unit test cases under our belt, it's time to finish our SpeedConversionService. Let's add another unit test case where we input 20 and expect the correct output, 12.
[Theory]
[InlineData(0,0)]
[InlineData(10,6)]
[InlineData(11,7)]
[InlineData(20,12)]
public void ConvertToMilesPerHour_Input_Expected(int input, int expected)
{
    var milesPerHour = speedConverter.ConvertToMilesPerHour(input);

    Assert.Equal(expected, milesPerHour);
}
Our tests now fail because inputting 20 results in 0. We could add another if-statement to our ConvertToMilesPerHour method, but it's clear if this method is convert all the possible miles per hour inputs, this approach isn't feasible. Let's try to implement the conversion formula for converting miles per hour to kilometers per hour.
mph = kph * 0.62137
I'm going to implement this using the System.Math.Round() method.
using System;

namespace SpeedConverter.Code
{
    public class SpeedConversionService
    {
        public int ConvertToMilesPerHour(int kilometersPerHour)
        {
            return (int)Math.Round(kilometersPerHour * 0.62137);
        }
    }
}
Now, with our unit tests at our disposal, we confidently change the ConvertToMilesPerHour method like I've done here and know whether it's going to work or not by running our xUnit test suite. And without further ado, survey says...
Test Run Successful.
Total tests: 4
     Passed: 4
 Total time: 1.1113 Seconds
Awesome, it works; all of our unit tests pass! With this test coverage we've built with our xUnit test cases, we can (and should) feel confident our code is behaving in the way we expect.
Wrapping Up
In this article, we've explored the basics of unit testing C# code using the xUnit testing framework using a TDD approach. We were able to inform xUnit of our test methods by way of using the [Fact] attribute. We were able to incrementally arrive to a complete solution of converting kilometers per hour to miles per hour using the rules of TDD and the Red-Green-Refactor workflow. After recognizing repetition of setup code in all of our test cases, we used a class variable and initialized the variable through the class constructor to inform xUnit to give us a new instance of SpeedConversionService before every test. And further, we were able to recognize the repetition in all of our tests in that we were testing the input and expected output of the ConvertToMilesPerHour method every time, and we refactored our tests to use a single method that uses xUnit's [Theory] and [InlineData] attributes.
I hope this article was helpful in providing an introduction to unit testing C#.NET code with the xUnit testing framework using a bit of TDD.
All of the code I used in this demonstration is on Github, and you can find it here. If you notice something that's wrong, or you have a suggestion, feel free to submit a pull request!
Happy coding!